How to Replace Your Garage Door Weatherstripping and Stop Pest Entry
I’ve lost count of how many times homeowners have called me because they found spiders, rodents, or insects making their way into their garage through worn weatherstripping. After two decades serving San Diego homes, I can tell you that damaged weatherstripping is one of the most overlooked maintenance issues that creates real problems for families.
Your garage door weatherstripping does more than keep out pests. It blocks dust, reduces noise, and helps maintain temperature control, which matters even in our mild Southern California climate. Let me walk you through everything I’ve learned about replacing it properly.
What Are the Signs Your Weatherstripping Needs Replacement?
Visible cracks or brittleness in the rubber material
Gaps under the door when fully closed
Daylight peeking through the sides or bottom
Hardening or flattening of the seal (won’t spring back when pressed)
Pest droppings near the garage entrance
I also check for hardening or flattening of the rubber material. Fresh weatherstripping should be flexible and springy. If I can press it and it doesn’t bounce back, it’s lost its sealing ability and needs to go.
Pest droppings near the garage entrance tell me immediately that weatherstripping has failed. San Diego’s year-round warm weather means bugs and rodents are always looking for entry points, and your garage is prime real estate if the seal is compromised. Regular Garage Door Maintenance Service helps catch these issues before they become serious problems.
Types of Garage Door Weatherstripping We Install
Bottom Seal (Door Sweep/Astragal)
Runs along the base of your door and takes the most abuse from concrete contact. This is your primary barrier against ground-level pest entry and moisture.
Side and Top Seals (Jamb Seals)
Line the vertical and horizontal tracks to prevent pests from entering through gaps between door panels and the frame. Essential for complete perimeter protection.
Threshold Seals
Attach to your garage floor and create an upward barrier. Recommended for homes in areas like Clairemont or Mira Mesa with persistent pest problems, especially in older neighborhoods with established rodent populations.
How to Replace Bottom Weatherstripping: The DIY Process
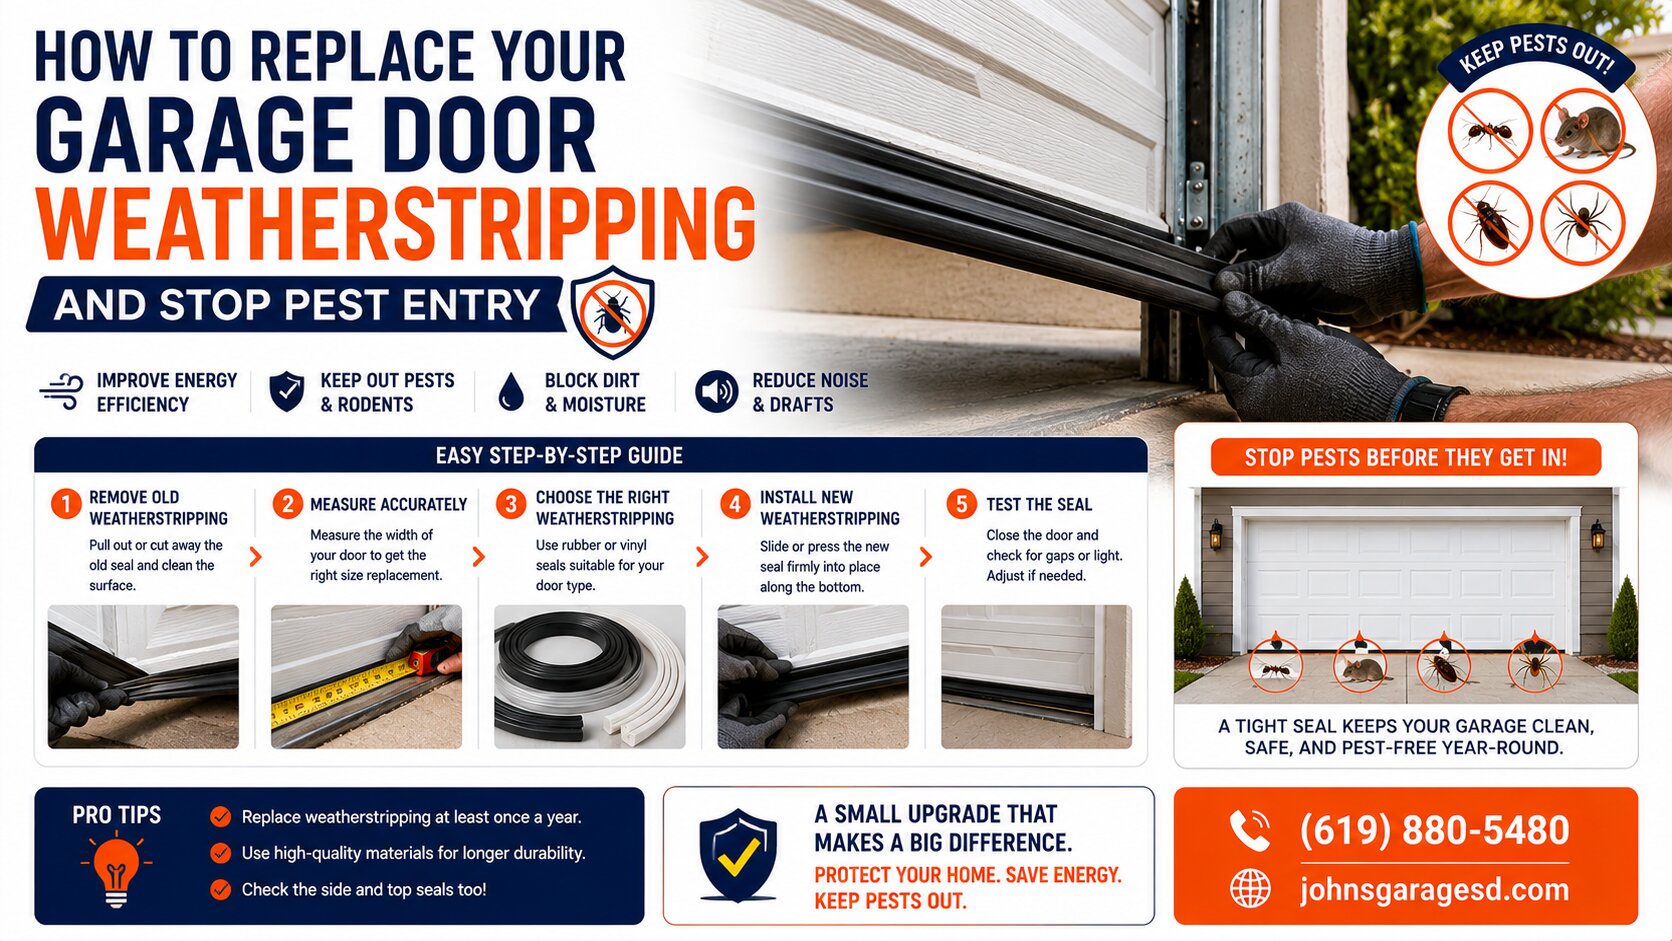
Measure the width of your door and purchase weatherstripping that matches your door’s profile (T-shaped, bulb-style, or beaded)
Remove the old seal by loosening the retaining channel (usually held by screws or friction-fit)
Clean the channel thoroughly to remove all dirt and debris
Slide the new weatherstripping into the channel from one end (use dish soap as lubricant for easier insertion)
Trim any excess length with a utility knife
Ensure the seal makes complete contact with your garage floor when the door closes
When to Call a Professional Instead
Side and top weatherstripping replacement often requires removing and reinstalling the track system. Attempting this without experience can result in bent tracks or misaligned doors.
If your weatherstripping failure has allowed moisture inside and you’re seeing rust on tracks or hardware, that’s my cue to do a comprehensive inspection. Coastal areas like Point Loma or La Jolla accelerate corrosion, and what starts as a weatherstripping issue can reveal larger problems.
Uneven gaps usually indicate a bigger issue than just worn seals. This suggests the door itself is out of alignment, the tracks need adjustment, or the foundation has settled — all of which require Professional Diagnosis And Maintenance.
I’ve seen homeowners accidentally damage their entire door system trying to replace side seals themselves. Professional installation ensures proper alignment and prevents costly mistakes.
Choosing the Right Weatherstripping Material for San Diego
EPDM Rubber (Best for San Diego)
Resists UV damage and temperature fluctuations. I’ve seen vinyl weatherstripping crack within two years on garage doors facing west, where afternoon sun exposure is intense.
Reinforced Rubber
Features internal support structures for maximum durability. Costs more upfront but lasts significantly longer, especially on heavy wooden doors common in older San Carlos or Kensington homes.
Avoid Big-Box Store Bargains
In my experience, the cheapest options flatten out within months and you’ll be replacing them again before the next season. Invest in quality materials for long-term protection.
If you’re considering a door upgrade, check out our Garage Door Color Selection Guide to match your new weatherstripping with a fresh look.
Keep Your Garage Sealed and Pest-Free
Proper weatherstripping protects your garage from unwanted visitors and extends the life of your door system by keeping moisture and debris out. I recommend inspecting your weatherstripping every six months and replacing it at the first sign of wear.
If you’re dealing with persistent pest entry, gaps you can’t identify, or you’re simply not confident tackling the replacement yourself, our team at John’s Garage Door is here to help. We’ve sealed thousands of San Diego garages and can diagnose issues you might miss. Get A Quote and we’ll make sure your garage stays secure and pest-free.
John Josef – 15 Years of Garage Door Expertise – John’s Garage Door Services, Locally Owned and Operated. We provide top-quality garage door repair, installation, and maintenance with a strong commitment to honest, reliable customer service.
Share This Story, Choose Your Platform!
Get In Touch With Us
Recent Works
Repair In Bonsall, California 92003John Josef2026-09-21T04:01:26-07:00
Repair In Campbell, California 95008John Josef2026-09-17T04:01:29-07:00
Garage Door Repair / Installation In Moreno Valley, California 92557John Josef2026-09-13T16:01:24-07:00
Garage Door Repair In San Diego, California 92109John Josef2026-09-08T22:01:38-07:00